> ## Documentation Index
> Fetch the complete documentation index at: https://docs.parahelp.com/llms.txt
> Use this file to discover all available pages before exploring further.
# Plain connection setup
> Connect Parahelp to your Plain workspace.
How to prepare the values Parahelp asks for when connecting Plain.
During setup, Parahelp asks you for three things: your **Plain workspace URL**, a **machine-user API key** (with **All** permissions), and the **request signing secret**. This guide shows where to get them. Parahelp sets up the webhook automatically, so there is nothing else to build in Plain.
## 1. Create the machine user
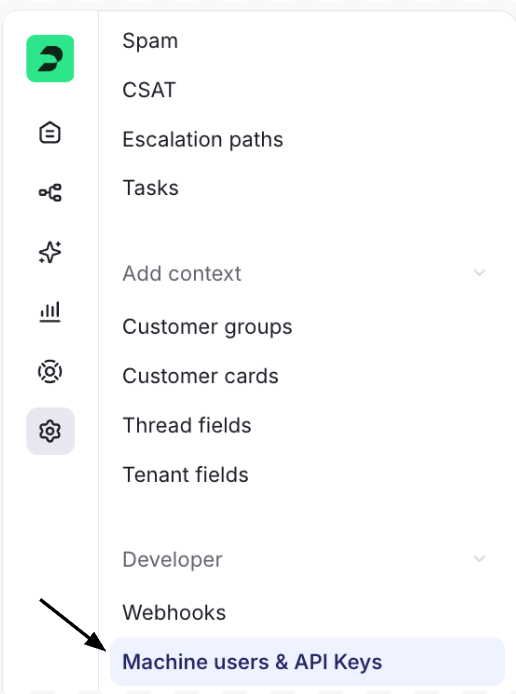
Go to **Settings → Machine Users**.
 {/* SCREENSHOT */}
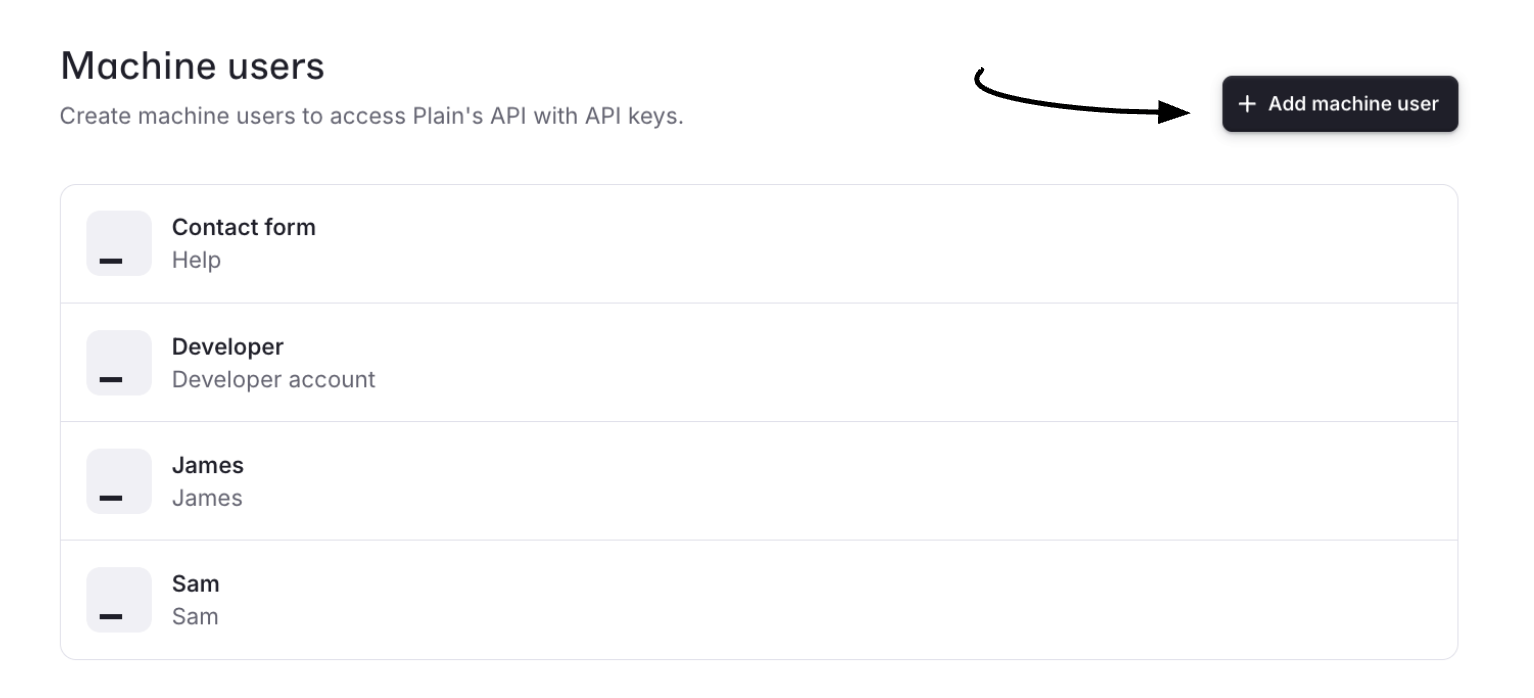
Select **Add Machine User**.
{/* SCREENSHOT */}
Select **Add Machine User**.
 {/* SCREENSHOT */}
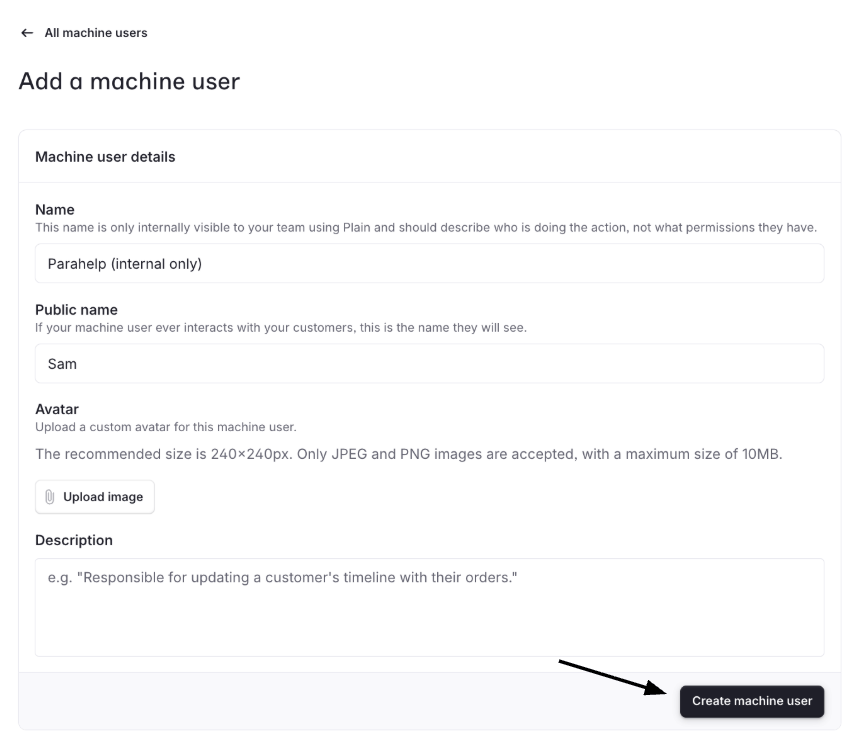
Set **Name** to a clear internal name for the agent, for example your agent's name.
Set **Public name** to the customer-facing agent name. Customers see this name when the agent replies, so set it right up front. The machine user is your support agent in Plain.
**Create** machine user when done.
{/* SCREENSHOT */}
Set **Name** to a clear internal name for the agent, for example your agent's name.
Set **Public name** to the customer-facing agent name. Customers see this name when the agent replies, so set it right up front. The machine user is your support agent in Plain.
**Create** machine user when done.
 {/* SCREENSHOT */}
## 2. Create the API key
On the machine user's page, select **Add API Key**
{/* SCREENSHOT */}
## 2. Create the API key
On the machine user's page, select **Add API Key**
 {/* SCREENSHOT */}
* In the permissions header, open the **Filter** dropdown. The **Recommended** vs **All** choice lives inside it, so it is easy to miss.
* Choose **All** (\~370 permissions) and select everything. Do not pick permissions one by one.
{/* SCREENSHOT */}
* In the permissions header, open the **Filter** dropdown. The **Recommended** vs **All** choice lives inside it, so it is easy to miss.
* Choose **All** (\~370 permissions) and select everything. Do not pick permissions one by one.
 The All set is needed so the agent can reply, assign, update threads, create the webhook target during setup, and support future Plain tools. The default **Recommended** set (\~270 permissions) leaves out the webhook, thread, and customer permissions.
See [Plain's API key guide](https://www.plain.com/docs/graphql/authentication) for reference.
{/* SCREENSHOT */}
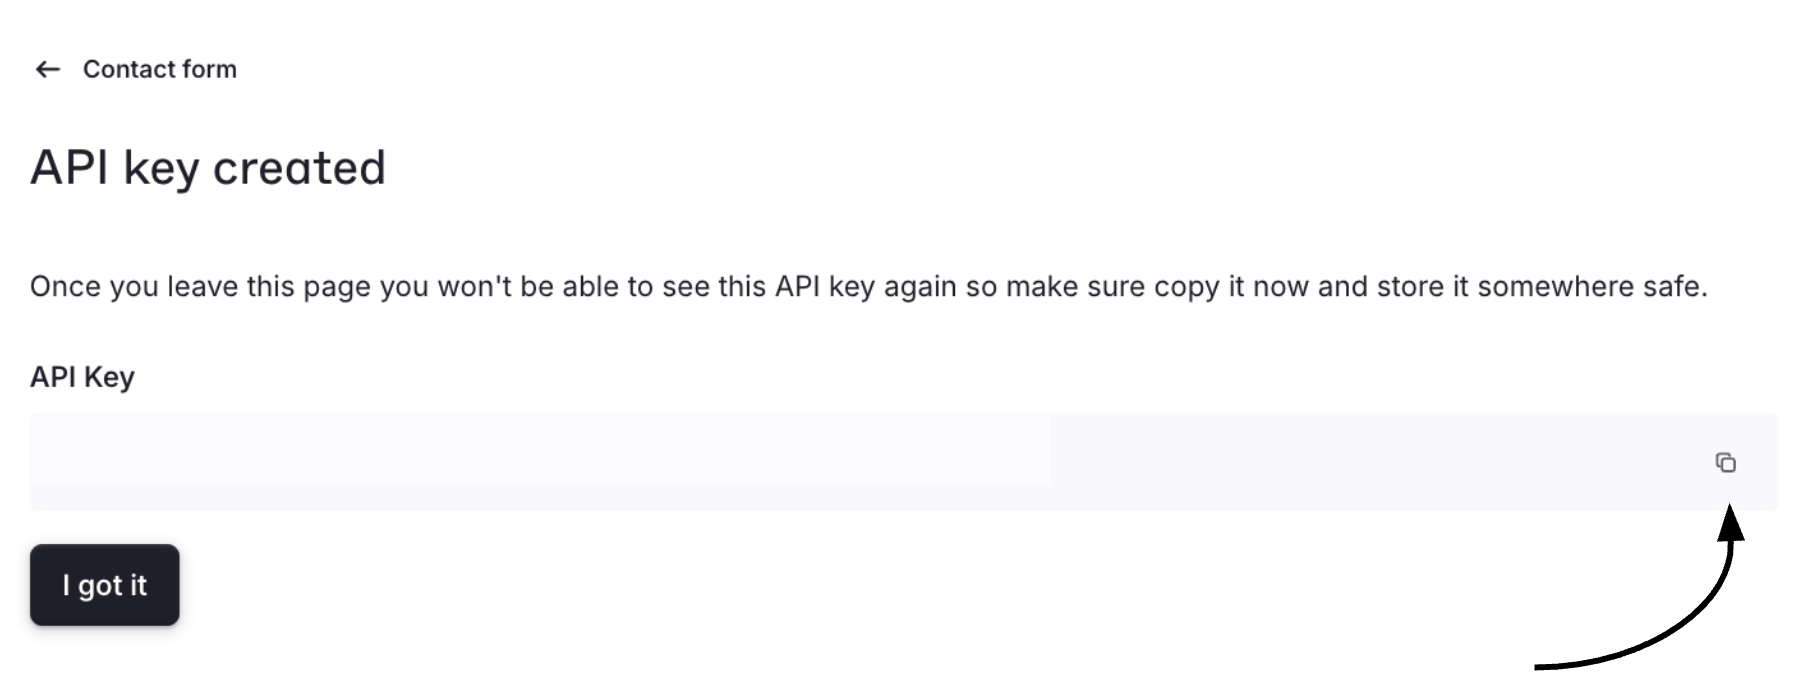
Click **Create API Key**, then **copy the key immediately**. Plain shows it only once.
The All set is needed so the agent can reply, assign, update threads, create the webhook target during setup, and support future Plain tools. The default **Recommended** set (\~270 permissions) leaves out the webhook, thread, and customer permissions.
See [Plain's API key guide](https://www.plain.com/docs/graphql/authentication) for reference.
{/* SCREENSHOT */}
Click **Create API Key**, then **copy the key immediately**. Plain shows it only once.
.png?fit=max&auto=format&n=DOeWgZPaZhod41Qo&q=85&s=dec50fdd004d492b03eb1265af5aeef0)
 {/* SCREENSHOT */}
## 3. Copy the workspace URL
Copy your Plain workspace URL from the browser. It should include `/workspace/...`.
## 4. Copy the request signing secret
Open **Settings → Request signing** and copy the **HMAC secret**. If none exists, generate one, then copy it.
See [Plain's request signing guide](https://www.plain.com/docs/request-signing) for reference.
{/* SCREENSHOT */}
{/* SCREENSHOT */}
## 3. Copy the workspace URL
Copy your Plain workspace URL from the browser. It should include `/workspace/...`.
## 4. Copy the request signing secret
Open **Settings → Request signing** and copy the **HMAC secret**. If none exists, generate one, then copy it.
See [Plain's request signing guide](https://www.plain.com/docs/request-signing) for reference.
.png?fit=max&auto=format&n=FLKdZyKqCC2DCuXG&q=85&s=7773ed79318ae18092b33535c7c1dba9) {/* SCREENSHOT */}
## 5. Enter the values in Parahelp
Give Parahelp the three values when it asks:
* **Workspace URL** (from step 3)
* **API key** (from step 2)
* **Request signing secret** (from step 4)
Parahelp uses this API key as the runtime Plain key: it validates the key, derives the machine-user id from it, and creates or reuses the webhook target automatically.
There is no agent confirmation step: the machine user you created is the support agent, and its **Public name** is what customers see on replies.
If a later step fails with a permission or forbidden error, the API key was most likely created with the **Recommended** set. Recreate it with **All** via the **Filter** dropdown.
Once connected, [assign threads to Parahelp](/guides/plain-assigning).
{/* SCREENSHOT */}
## 5. Enter the values in Parahelp
Give Parahelp the three values when it asks:
* **Workspace URL** (from step 3)
* **API key** (from step 2)
* **Request signing secret** (from step 4)
Parahelp uses this API key as the runtime Plain key: it validates the key, derives the machine-user id from it, and creates or reuses the webhook target automatically.
There is no agent confirmation step: the machine user you created is the support agent, and its **Public name** is what customers see on replies.
If a later step fails with a permission or forbidden error, the API key was most likely created with the **Recommended** set. Recreate it with **All** via the **Filter** dropdown.
Once connected, [assign threads to Parahelp](/guides/plain-assigning).